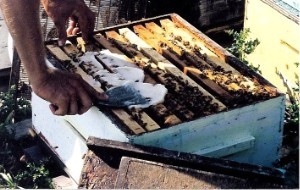
Close-up of hives with box
feeders; one feeder still in place, the one on the right
has been removed and left
sitting on top of the cover.
| Home | Queens | Honey Production | Employment | Contact Us | Research & Publications | Tours | Items For Sale | Links | FAQs |
OUTSIDE WINTERING OF
SINGLE BROOD CHAMBER HIVES REVISITED
By John Pedersen, Gil Pedersen,
and Ed Pedersen, owners and operators of Pedersen Brothers Apiaries, Cut
Knife Saskatchewan.
This is a follow-up to an article on wintering single brood chamber hives, published in the May 1995 issue of the American Bee Journal, and also published in Canadian Beekeeping and the S.B.A. Newsletter. Since its publication, we have received many inquiries seeking more information on the subject. Some of the queries include:
Pollen being stored above the excluder is seldom a problem if there are no extra entrances to the hive. Many beekeepers advocate using a second opening near the top of the hive to facilitate the bees ventilating and cooling the hive. We did use an upper ventilation opening for several years, but found that the bees did not store honey on those portions of the combs that were close to the opening. It may be necessary to use an upper vent in extremely hot climates, but we are not convinced that it is needed here even though the temperature can be at, if not above, 30°C for many days in a row. To repeat, if you allow the bees only one entrance at the bottom of the hive, pollen is generally stored in the brood chamber.
Close-up of hives with box
feeders; one feeder still in place, the one on the right
has been removed and left
sitting on top of the cover.
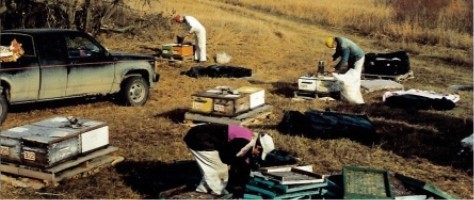
For feeding we use box type hive-top feeders. We begin feeding in late August or early September, as soon as the last honey supers are removed. All hives are hefted before each round of feeding to gauge how much sugar they need. Our mixing tank holds 1300 litres. We use 25 40kg bags of sugar and enough water to fill the tank and completely dissolve the sugar. This tankful is then divided evenly among 100 colonies, giving each hive an initial feeding of 13 litres of syrup or 10 kg of sugar. In this first feeding we mix in the recommended dosage of both oxytetracycline and fumagillin. When the bees have taken up this syrup, a second round of feeding will give a similar ration of feed to each hive without the fumagillin. On the third round only those hives, which do not feel sufficiently heavy, are given additional syrup. We try to give all hives the equivalent of 25 to 30 kg of sugar. If there is a fall flow of late alfalfa or other such crop, the bees will often gather enough extra so we sometimes need little more than the initial feeding.
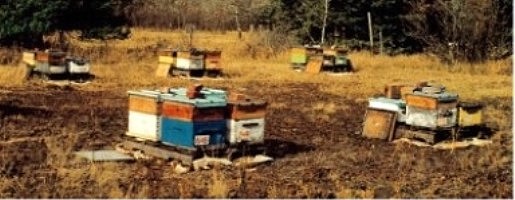
Yard in October with some
feeders still on hives and other feeders removed and leaning against hives.
One correspondent assumed that we used an additional super of honey above an excluder for winter feed. We don't. To date, all the feed we have used was in the single brood chamber.
However, as a result of the long drawn out cold spring that we endured this past season, we are planning an experiment for this coming winter. Despite the fact that we made a round of all the yards in the early spring and added feed directly onto the top bars, some hives that had survived the winter starved during the spring. The feed we added was composed of salvage honey that had spilled on the floor during extracting season, plus a slurry of sugar and water. This was mixed together to the consistency of crystallized honey.
While some hives had adequate stores, others were short. The experiment consists of placing shallow supers under the regular hive body on a few hives in several yards. We shall feed enough extra sugar to allow the bees to fill this shallow super. Our theory is that the additional honey will be an insurance against a similar situation in future years. By placing the shallow super below the regular hive body, we hope to avoid having brood laid before we remove the super. We shall know more by this time next year.
As mentioned, we use oxytetracycline for foulbrood control. In addition to feeding oxytet in sugar syrup in the fall, we mix it with icing sugar and sprinkle it on the top bars during spring inspections of the colonies. Our incidence of American foulbrood is very low; only occasionally do we spot a hive with the disease. (We have, as yet, never seen any sign of European foulbrood.) Hives that show signs of AFB are removed to a special yard and given additional treatments of oxytet until no further signs of the disease appear. Then it rejoins an apiary and is handled the same as all other hives. The one treatment in the fall is our only attempt for nosema control. To date we have had no sign of varroa mites so we do not take any control measures for this pest. The summer of 1995 was the first time that any of our samples for tracheal mite showed a positive. One sample from 35 submitted showed 1% mites. We are now planning to do more extensive testing, and treat as necessary with menthol, administered on corrugated cardboard on the bottom board. This treatment will be done in the late summer after the honey flow is over and in the spring before the honey flow starts. Other diseases, such as chalkbrood and sacbrood, while present occasionally, are not treated.
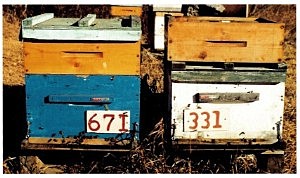
We keep all of our hives on pallets, four hives to a pallet, with generally ten pallets to a yard. The hives stay on these pallets year-round. We use several different colours to paint our supers. (We buy mis-tinted paint from stores. This leads to some odd colours, but it is cheaper than using custom-tinted paint.) By taking care that adjacent hives are not of the came colour, the bees are given a better chance of becoming oriented to their own hive. In spring the hives are moved away from each other, to the limit of the pallet's dimensions. This facilitates working with the individual hive. The pallets are arranged in the yard so that all hives face either east or west - two in each direction on each pallet. Also, the yards are chosen with natural shelter from the north and the west. This is the direction from which our prevailing winds occur. We try to avoid sitting yards in low spots so as to circumvent having stagnant air (or water) collecting around them at any time of the year, but especially in the winter. Somewhat open exposure to the south and east allows for plenty of sunlight to reach the hives.
For winter packing, which we try to complete during October, the hives are placed as close together as possible on the pallet. The regular hive covers are removed and replaced with a plywood cover that has a 10mm rim on the bottom side. This rim is interrupted on the front side to leave a top entrance about 10 mm deep and 50 mm long. Use of a top entrance allows for ventilation during the winter and is an easy way for excess water vapour and carbon dioxide to escape. The cover is fastened to the hive using one or two drywall screws.
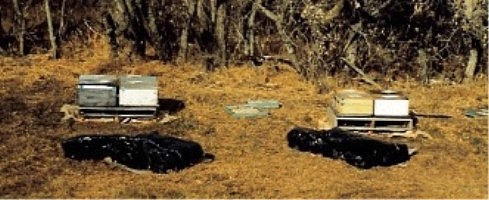
Insulation wraps set out
by hive pallets in preparation for packing.
Late October. Crew preparing
hives for wrapping insulation around quad hive unit.
From left to right:
Ed Pedersen, Kelly McNaughton and Gil Pedersen.
The four-hive unit is then wrapped with an insulating pack. This is made using a strip of 6 mil black plastic (polyethylene) about 1.2 m wide and 5 m long. R12 fibreglass insulation batts, 585 mm wide, are split lengthwise and four such narrow batts are laid end to end on one side of the plastic, making the wrap long enough to encircle the four hives on the pallet. Once the insulation is in place on the plastic, the opposite side of the plastic is folded over the insulation and heat sealed to the first side, sealing the insulation inside.
The plastic-covered insulation is wrapped completely around the four hives with the overlapping joint on the south side of pack. It is secured in place by using a length of plastic twine tied snugly around the insulation. Small holes are cut through the top edge of the wrap, corresponding to the top entrance of the winter cover. A small piece of plywood, about 75 mm x 120 mm, with an oblong hole of about 25 mm x 50 mm, is fastened over the top entrance hole. This is held in place using 2-30 mm drywall screws.
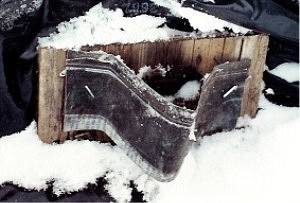
Close-up of top entrance with
wind deflector in place.
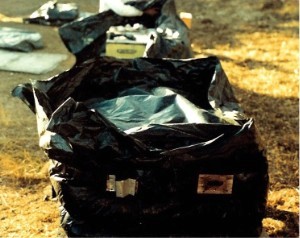
Quad hive unit with insulation
wrapped around and fastened in place. Top insulation pillow in
place with sides of wrap ready
to fold down before placing plywood cover over entire unit.
A pillow of plastic enclosing
R20 fibreglass batts, and sized to fit over the four-hive pack, is placed
over the hives.
The extra plastic flap
from the side packing is folded over the top of the top pillow and the entire
pack covered with a 1.2 m square sheet of plywood. The plywood is held down
using two lengths of plastic twine, which are tied to the edge of the pallet,
passed over the plywood, and tied tightly to the opposite edge of the pallet.
The strings are tied tightly enough to force the plywood into a curve. This
allows the pack to shed water if it rains.

Packs covered and ready for
winter. Note half sheets of plywood forced into a curve to allow any
rain
to run off. Also see
wind deflector at top entrance at right end of closest pack.
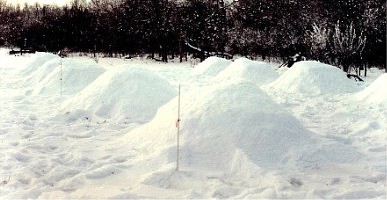
When there is sufficient depth of snow, we revisit the yards and completely cover the packs with snow. Depending on the winter, we might visit the yard more than once to make sure the packs are covered. One correspondent suggests that this could lead to smothering of the bees. Our snow conditions are such (dry fluffy snow) that this does not seem to happen. But we would advise anyone contemplating this method to try only a few packs the first year or so. It is possible that areas that receive heavy wet snow and have a higher ambient temperature than we do could have problems with the snow pack smothering the bees.
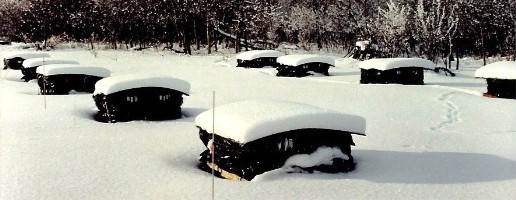
Insulated packs sitting in
the snow before covering. About December 1.
Same yard completely covered
with snow.
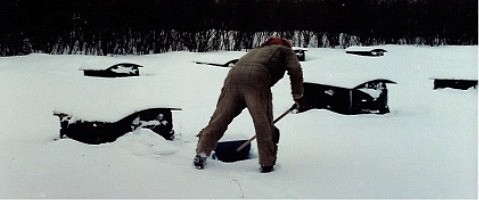
Ed beginning to shovel over
a pack. Early December.
Several correspondents asked about swarming problems during spring build-up. Spring swarms have never been a problem for us. For many years, before we began wintering our bees, we ran package hives. The rule of thumb for a hive started with a 2 lb. package was to add a honey super above the excluder when the bees come close to covering all nine combs. We still adhere to this practice. Don't let the bees get crowded before adding supers. Admittedly adding supers as needed is easier in our situation because we maintain most of our hives in permanent locations. For those beekeepers that are engaged in migratory beekeeping and move their hives several times a season, the adding of supers could pose problems when moving.
Supering the hives before the bees are crowded allows us to utilize extra honey flows. There is a progression of plants which bees work beginning in early spring. Some of the more important for our area, starting with the earliest and listed in their general order of blooming, are: various willows – Salix spp., followed by dandelion – Taraxacum spp., wild fruit (Saskatoon – Amelanchier ainifolia; Pin Cherry – Prunus pensylvanica; Choke Cherry – P. virginiana; and Hawthorn – Crataegus chrysocarpa), Wolf-willow – Elaeagnus commutata, and Caragana – Caragana arborescens. Some, like Caragana, which generally starts blooming in mid May and blooms for about three weeks, yield a great deal of honey. Some years there is considerable overlap in the above progression of bloom. It is rare that there would be a period with no flowers. There are many other plants, of somewhat lesser importance, that bloom during this same period. If we did not begin supering until the alfalfa and canola began flowering, in early to mid June, we would miss this earlier flow, plus (probably) losing a lot of bees to swarms.
Summer swarming is another matter. When the main honey flow is on, hives can become crowded in only a few days. Our practice is to have from three to five supers on each hive by the end of June. Honey removal generally begins during the first week of July. During the period of strong honey flow, we use the tip-off method of honey removal. The full supers are removed and stood on end on pallets beside the hives and re-supering is done immediately. The bees generally leave the tipped up supers in a few hours and return to their hives. The supers can then be picked up and taken to the honey-house. If we can complete a round of stripping in 10 to 14 days, there is not too much danger of severe overcrowding and thus of swarming. But, as sometimes happens, when there is a wet spell and the bees can't fly, they sit in the hive and plot revolution. We can generally predict a rash of swarming about two weeks after inclement weather that lasts more than one day. We maintain one or two swarm traps at each yard and catch some swarms in this way.
Some of our correspondents are curious as to how and when we re-queen. We are working on an article specifically about our queen raising enterprise in which the subject will be covered in more detail. But in the meantime, the following is a short over-view of our queen management.
It is our practice to re-queen every hive every two years or sooner if the production is not up to the yard average. We raise our own queens from selected high producing colonies. In order to make informed decisions as to which are the superior queens, we keep honey production records from all individual hives. We select both queen mother and drone mother colonies using the data gathered from these production records.
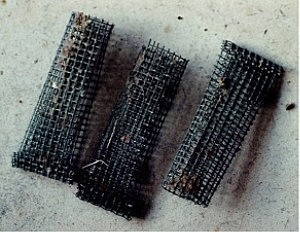
Our climate is such that we cannot count on good mating weather for queens until near the end of May. Thus, we arrange our breeding program to have virgin queens ready for mating at this time. Only when the young mated queens are available do we begin killing off the old queens and replacing them with new queens. Re-queening, which begins in early June, continues intermittently, as time permits, for the rest of the summer. While the honey flow lasts, the method used is as follows: The hive is inspected and the old queen is found and killed. One or two days later the new queen is introduced using a cage made of 7 x 7 or 8 x 8 hardware cloth. This is made by cutting a piece of screen about 80 mm square. This is then rolled into a tube with a diameter of about 20 mm and the tube is slightly flattened. One end is pinched off and a small bit of the material bent back on itself.
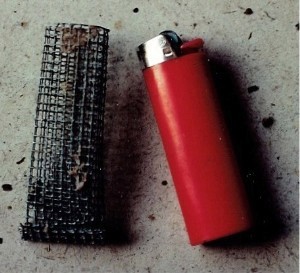
Another shot of queen cage
with butane lighter to indicate size.
To use the cage thus formed, you merely catch a queen and a few attendant bees and put them into the cage through the open end. Once the bees are inside, the cage is plugged with a portion of marshmallow. This cage is then placed into the hive and tucked between two adjacent combs. The screen construction allows the bees of the hive to contact the new queen and release her by chewing out the marshmallow.
In the late summer and fall hives are re-queened by using two or more combs of brood from a 5-frame nuc. This reduces the risk that the colony will reject the new queen. When we are feeding the hives for winter, we will occasionally come onto a hive that is not taking its sugar syrup even though it is light. Such a hive is opened and inspected. Sometimes the hive is found to be queenless. If we do not have more queens, the hive is united with another. If, on the other hand, it is found that there is a queen in the hive, she is killed and the hive re-queened using a nuc. Our experience has been that hives that do not take syrup in the fall do not produce a honey crop the next season even if they survive the winter.
With our queen breeding program we are totally self-sufficient in queens and replacing winter losses. We make increases in several ways. About 25 hives are started each year by utilizing swarms that either are found in our swarm traps or are hanging in the yard. A few hives are started with bees that are brought to the honey-house with supers. The most common method for making increases is to expand our standard 5-frame nuc, which is used in our queen raising program) up to a regular bottom and supplement this unit with extra bees and brood. The degree of supplementation depends on what time during the summer it is being done. In June one extra comb of brood and bees is sufficient to produce a strong hive. By the end of August we make sure that there are seven combs with brood and a corresponding amount of bees.
These 5-frame nucs are started in late May by selecting two combs of bees and brood from strong hives. These nucs are moved to special yards with one regular hive, which is a drone mother. When the 5-frame nucs are set up, a 14-day-old queen cell is placed between the top bars. The nuc is checked in two or three days to see if the cell has hatched. The odd one that does not hatch is replaced with a fresh cell and the process repeated. Once the cell hatches and the queen is mated and starts laying, we can do one of several things: sell the nuc to another beekeeper (we sold 150 nucs in June and early July this year), let it build in strength for 8 few weeks, then expand it into a regular bottom, or use it to re-queen weak hives. Whatever the ultimate use of the nuc, you must be vigilant and remove combs of honey, which they have a strong propensity to store during June and July. Once they become crowded, they can swarm like any other colony. The combs that are removed are replaced with empty combs so they will have as much room as possible in the nuc. By keeping room in the nuc, it can be maintained for the whole summer.
To reiterate what was stated in the previous article: We are satisfied that our management practice, i.e. wintering single brood chamber hives outside, reduces our capital requirements significantly and is, on the whole, very successful. We see no reason that other beekeepers in a climate similar to ours could not have equal success. For those beekeepers who are considering following our example and wintering hives in a single brood chamber, we would urge a certain amount of caution. Do not put all your eggs in one basket. Someone with several hundred hives could try 50 to 100 the first year, then critically evaluate the results. It works for us; it should work for others.
Inquiries have come from a
large area of Canada and the United States as well as Spain. The winter climate
is not the same in New York or Massachusetts on the one hand, or Arkansas
on the other, as we experience in western Canada. To the beekeepers from
climates that differ from our polar continental one, we especially urge caution
and advocate that they try the system in a small way for the first couple
of years.
The tables shown here detail some of the highlights of wintering and honey production since 1988: (They have been updated to include 1996)
TABLE 1: Colony wintering
statistics:
|
|
|
|
|
|
|
|
|
|
|
|
|
|
|
|
|
|
|
|
|
|
|
|
|
|
|
|
|
|
|
|
|
|
|
|
|
|
|
|
|
|
|
|
|
|
|
|
|
|
|
|
|
|
|
|
|
|
|
|
|
|
|
|
|
|
|
|
|
|
|
|
|
|
|
|
|
|
|
|
|
|
|
|
|
|
|
|
|
|
|
|
|
|
|
|
|
|
|
|
*Losses counted are those hives that are either dead or so weak that they must be united when pack is first inspected in the spring. Some losses reported are hives that are not queen-right and so must be united with other hives. These technically are not “winter losses”.
**Estimate
TABLE 2: Honey production
1989 – 1995
|
|
|
|
|
|
|
|
|
|
|
|
|
|
|
|
|
|
|
|
|
|
|
|
|
|
|
|
|
|
|
|
|
|
|
|
|
|
|
|
|
|
|
|
|
|
|
|
|
|
|
|
|
|
|
|
|
|
|
|
|
|
|
*Honey production was adversely affected due to a fire on July 18 of this year. The fire destroyed part of our warehouse, necessitating a period of clean-up, so there was a two-week hiatus before we were able to resume honey extraction. Poor weather also was a factor this season.
**Previous averages were based on actual producing hives. We are now calculating our average production based on total honey production divided by the number of hives put into winter the previous fall.
Published in American
Bee Journal, Volume 136, No. 3, March 1996, pp.181-186.
Published in Canadian Beekeeping,
Volume 19, No. 3, Spring 1996, pp.61-65.
Copyright © 2002 Pedersen Apiaries. All rights reserved. Original Design & Graphics by Karen Pedersen Photographic images are under copyright and used with permission of John Pedersen |